Tryout Flow
This document provides step by step instructions to invoke the Accounts Information Service API.
Note
You need to deploy and subscribe an API before invoking it. For the testing purposes, you can use the sample AccountandTransaction API we have included in the pack.
Click here to see how to deploy and subscribe to the sample API...
-
Sign in to the API Publisher Portal at https://localhost:9443/publisher with
creator/publisherprivileges. -
In the homepage, go to REST API and select Import Open API.

-
Select OpenAPI File/Archive.

-
Click Browse File to Upload and select
<APIM_HOME>/<OB_APIM_ACCELERATOR
_HOME>/repository/resources/apis/Accounts/account-info-swagger.yaml
. -
Click Next.
-
Leave the Endpoint field empty as it is and click Create.
-
Select Subscriptions from the left menu pane and set the business plan to Unlimited: Allows unlimited requests.

-
Click Save.
-
Add a custom policy. Follow the instructions given below according to the API Manager version you are using:
Click here to see how to add a custom policy if you are using API Manager 4.0.0...
-
Go to Develop -> API Configurations -> Runtime using in the left menu pane.
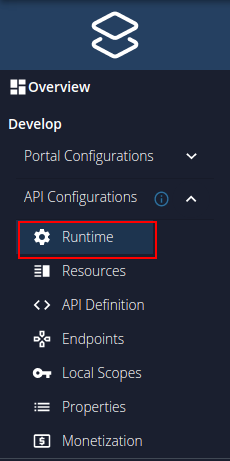
-
Click the edit icon under Request -> Message Mediation.
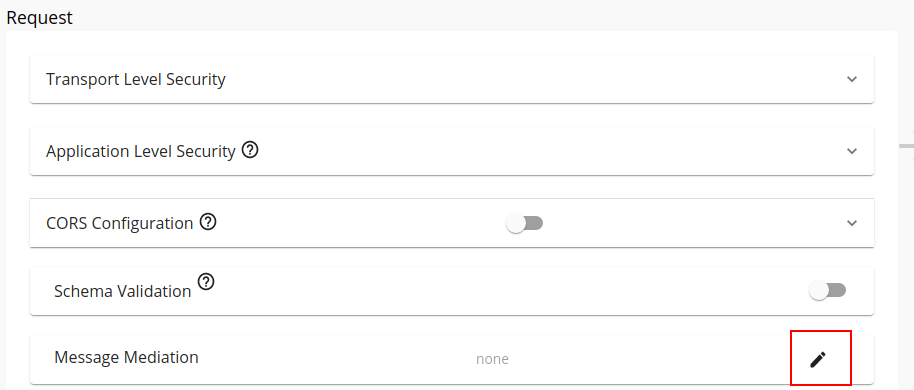
-
Select the Custom Policy option.
-
Upload the
<APIM_HOME>/<OB_APIM_ACCELERATOR_HOME>/repository/resources/apis/Accounts/accounts-dynamic-endpoint-insequence.xmlfile and click SELECT. -
Scroll down and click SAVE.
Click here to see how to add a custom policy if you are using API Manager 4.1.0 or 4.2.0...
-
Go to Develop -> API Configurations -> Policies in the left menu pane.
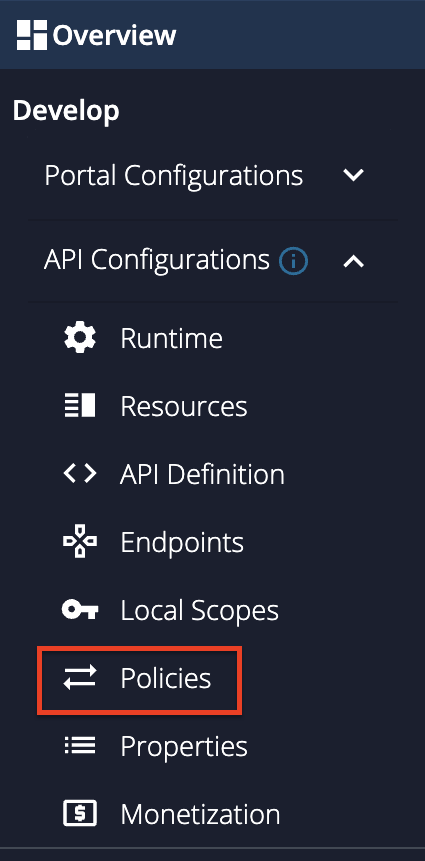
-
On the Policy List card, click on Add New Policy.
-
Fill in the Create New Policy.
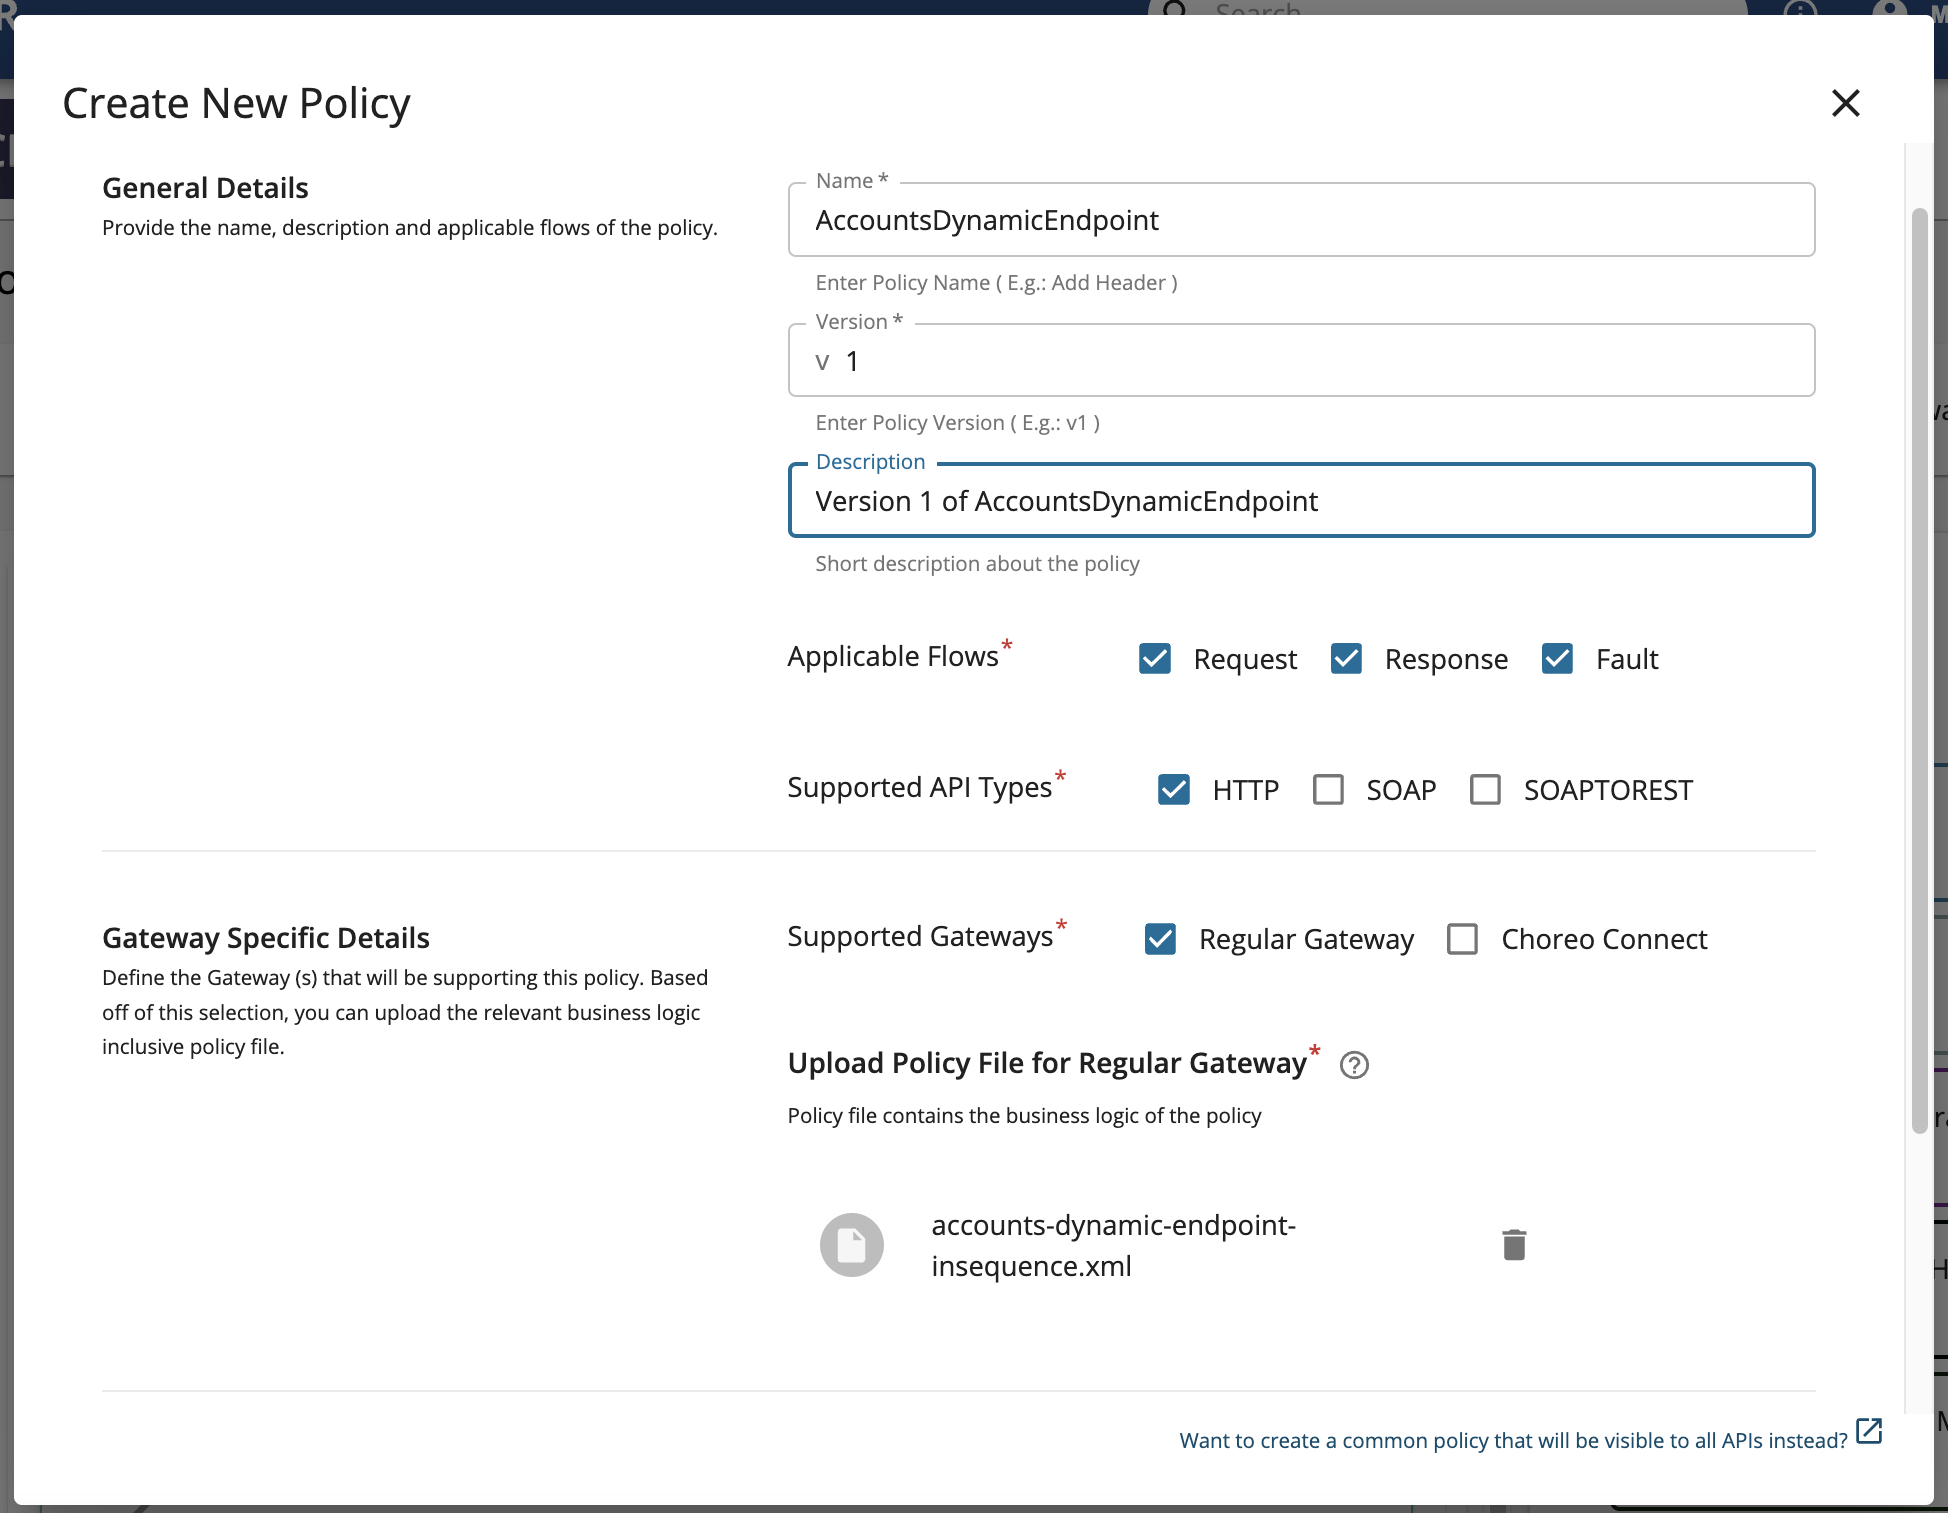
-
Upload the
<APIM_HOME>/<OB_APIM_ACCELERATOR_HOME>/repository/resources/apis/Accounts/accounts-dynamic-endpoint-insequence.xmlfile. -
Scroll down and click Save. Upon successful creation of the policy, you receive an alert as shown below:

-
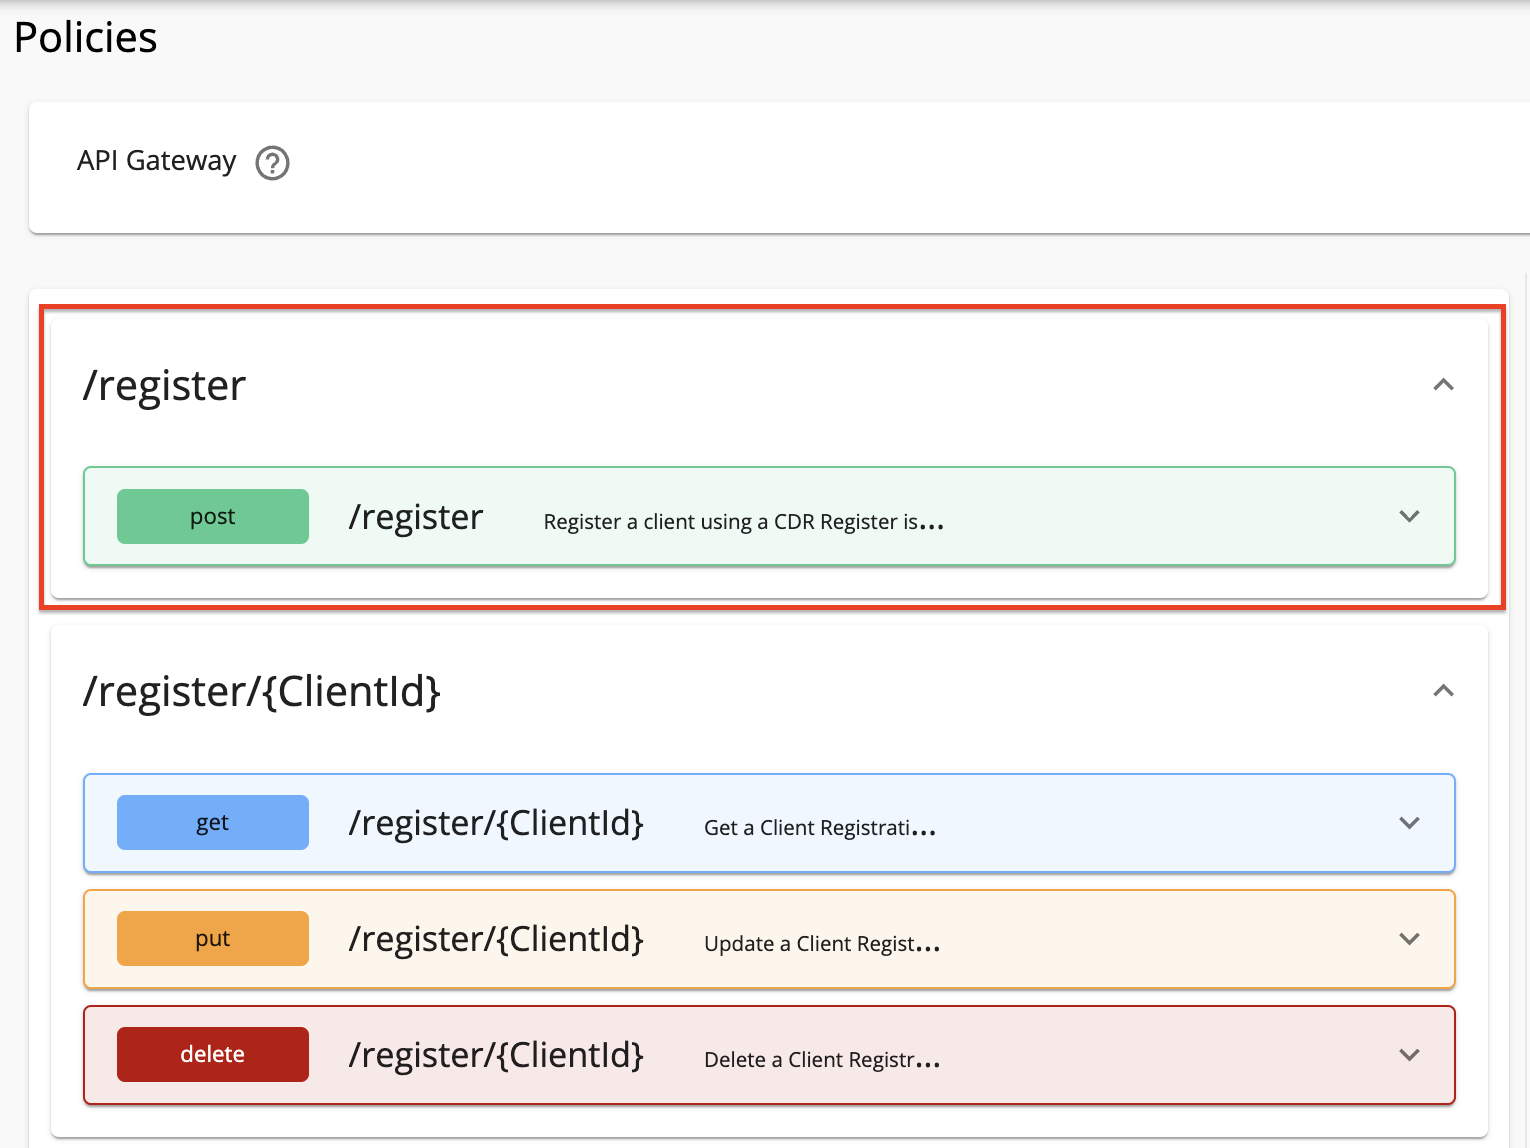
Expand the API endpoint you want from the list of API endpoints. For example:
-
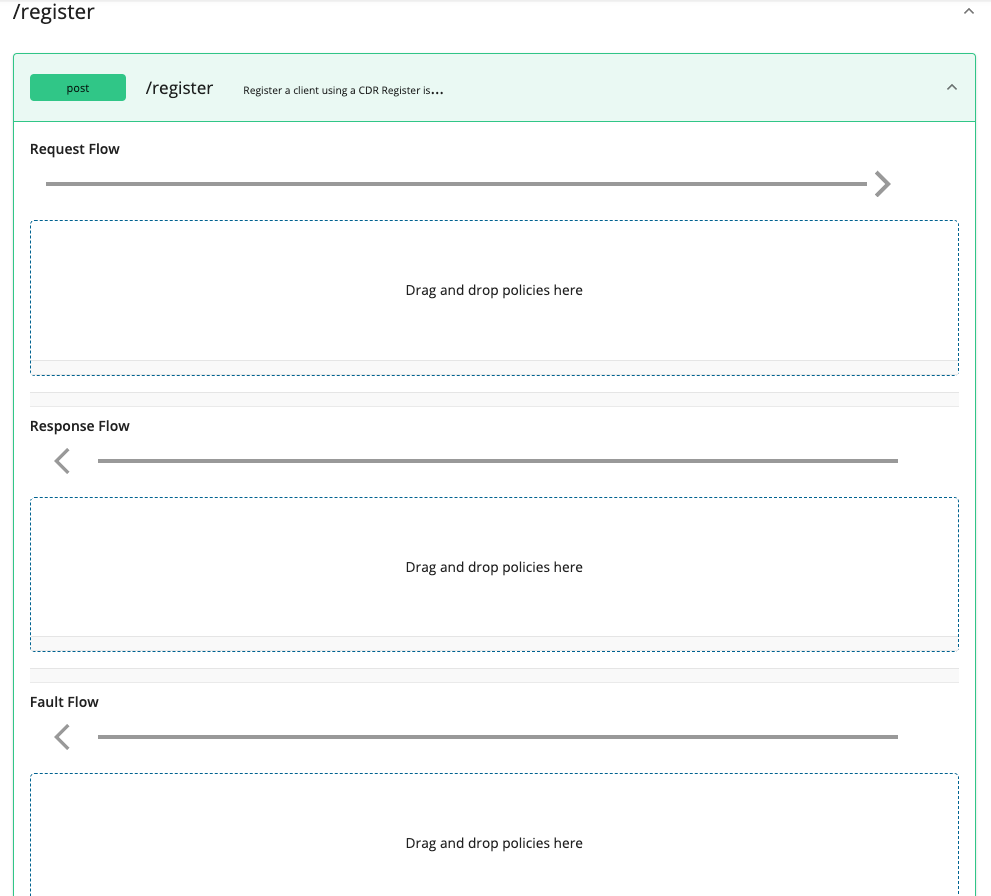
Expand the HTTP method from the API endpoint you selected. For example:
-
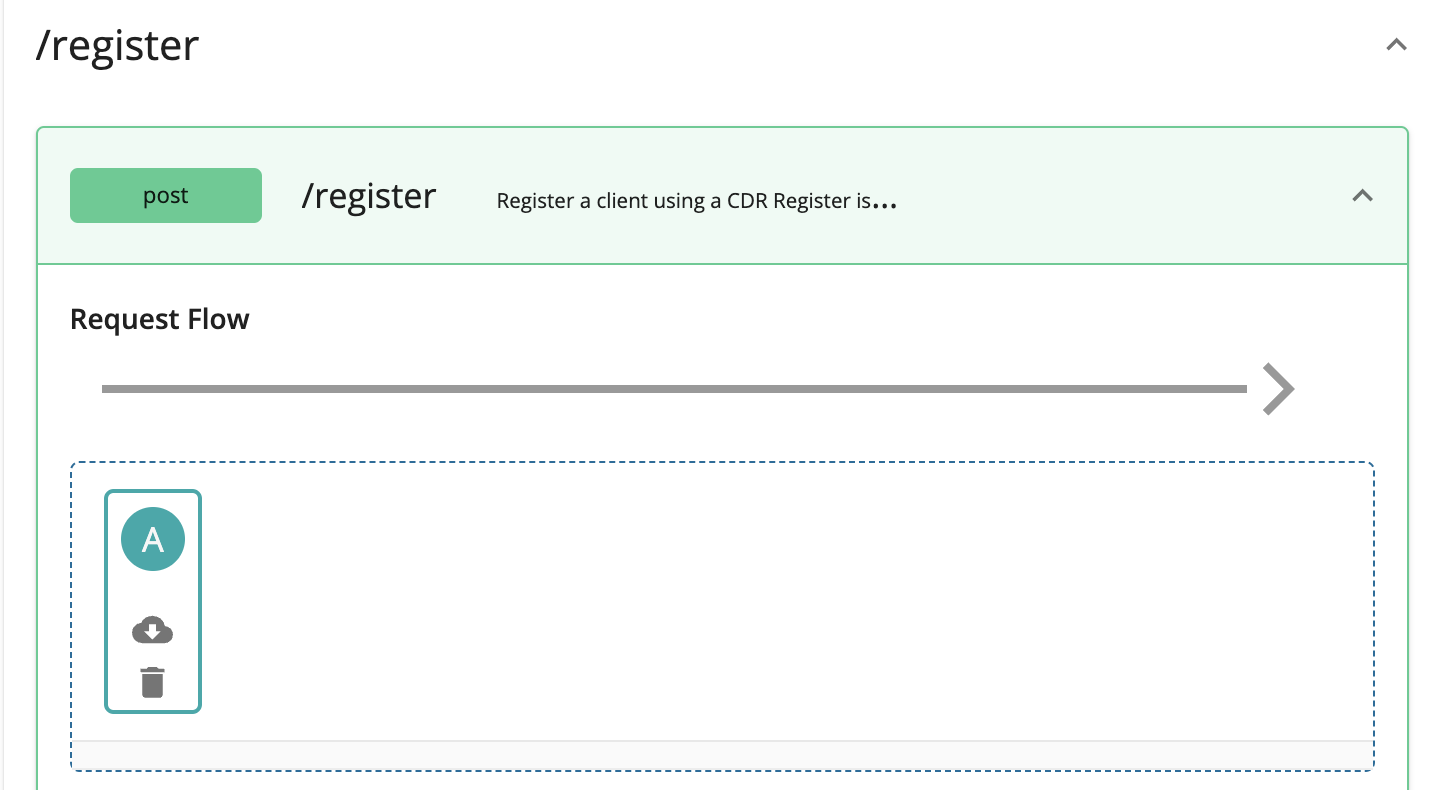
Drag and drop the previously created policy to the Request Flow of the API endpoint.
-
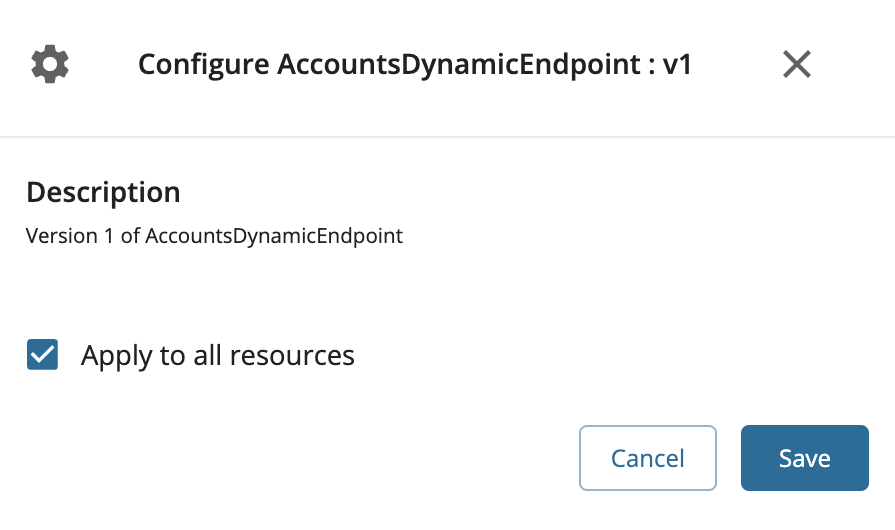
Select Apply to all resources and click Save.
-
Scroll down and click Save.
-
-
Go to Endpoints using the left menu pane and locate Dynamic Endpoint and click Add.

-
Select the endpoint types;
Production Endpoint/Sandbox Endpointand click Save.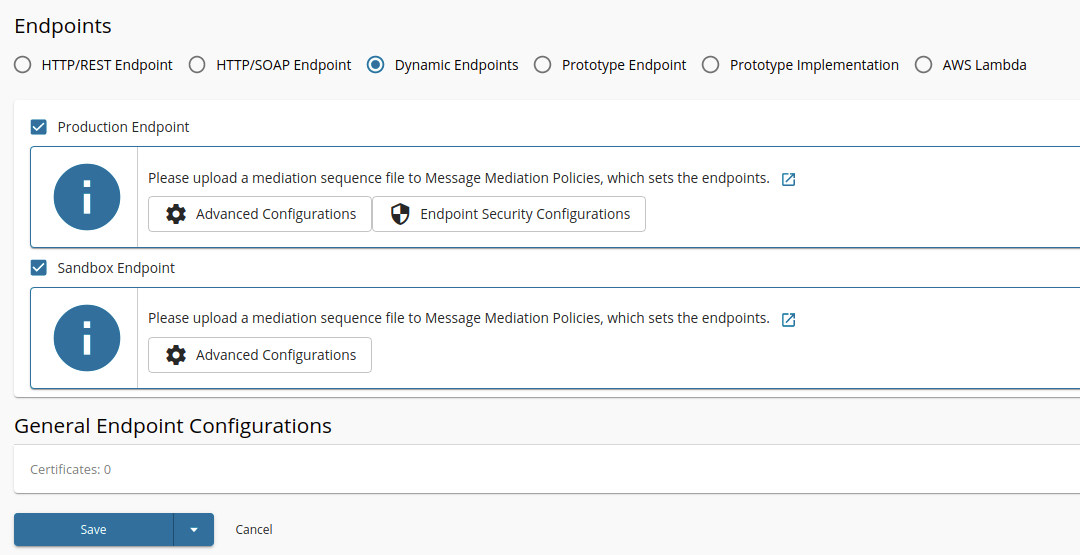
-
Go to Deployments using the left menu pane and click Deploy New Revision.
-
Provide a description for the new revision.
-
Select
localhostfrom the dropdown list. -
Click Deploy.
-
Go to Overview using the left menu pane and click Publish.
-
Now that you have deployed the API, go to https://localhost:9443/devportal.
-
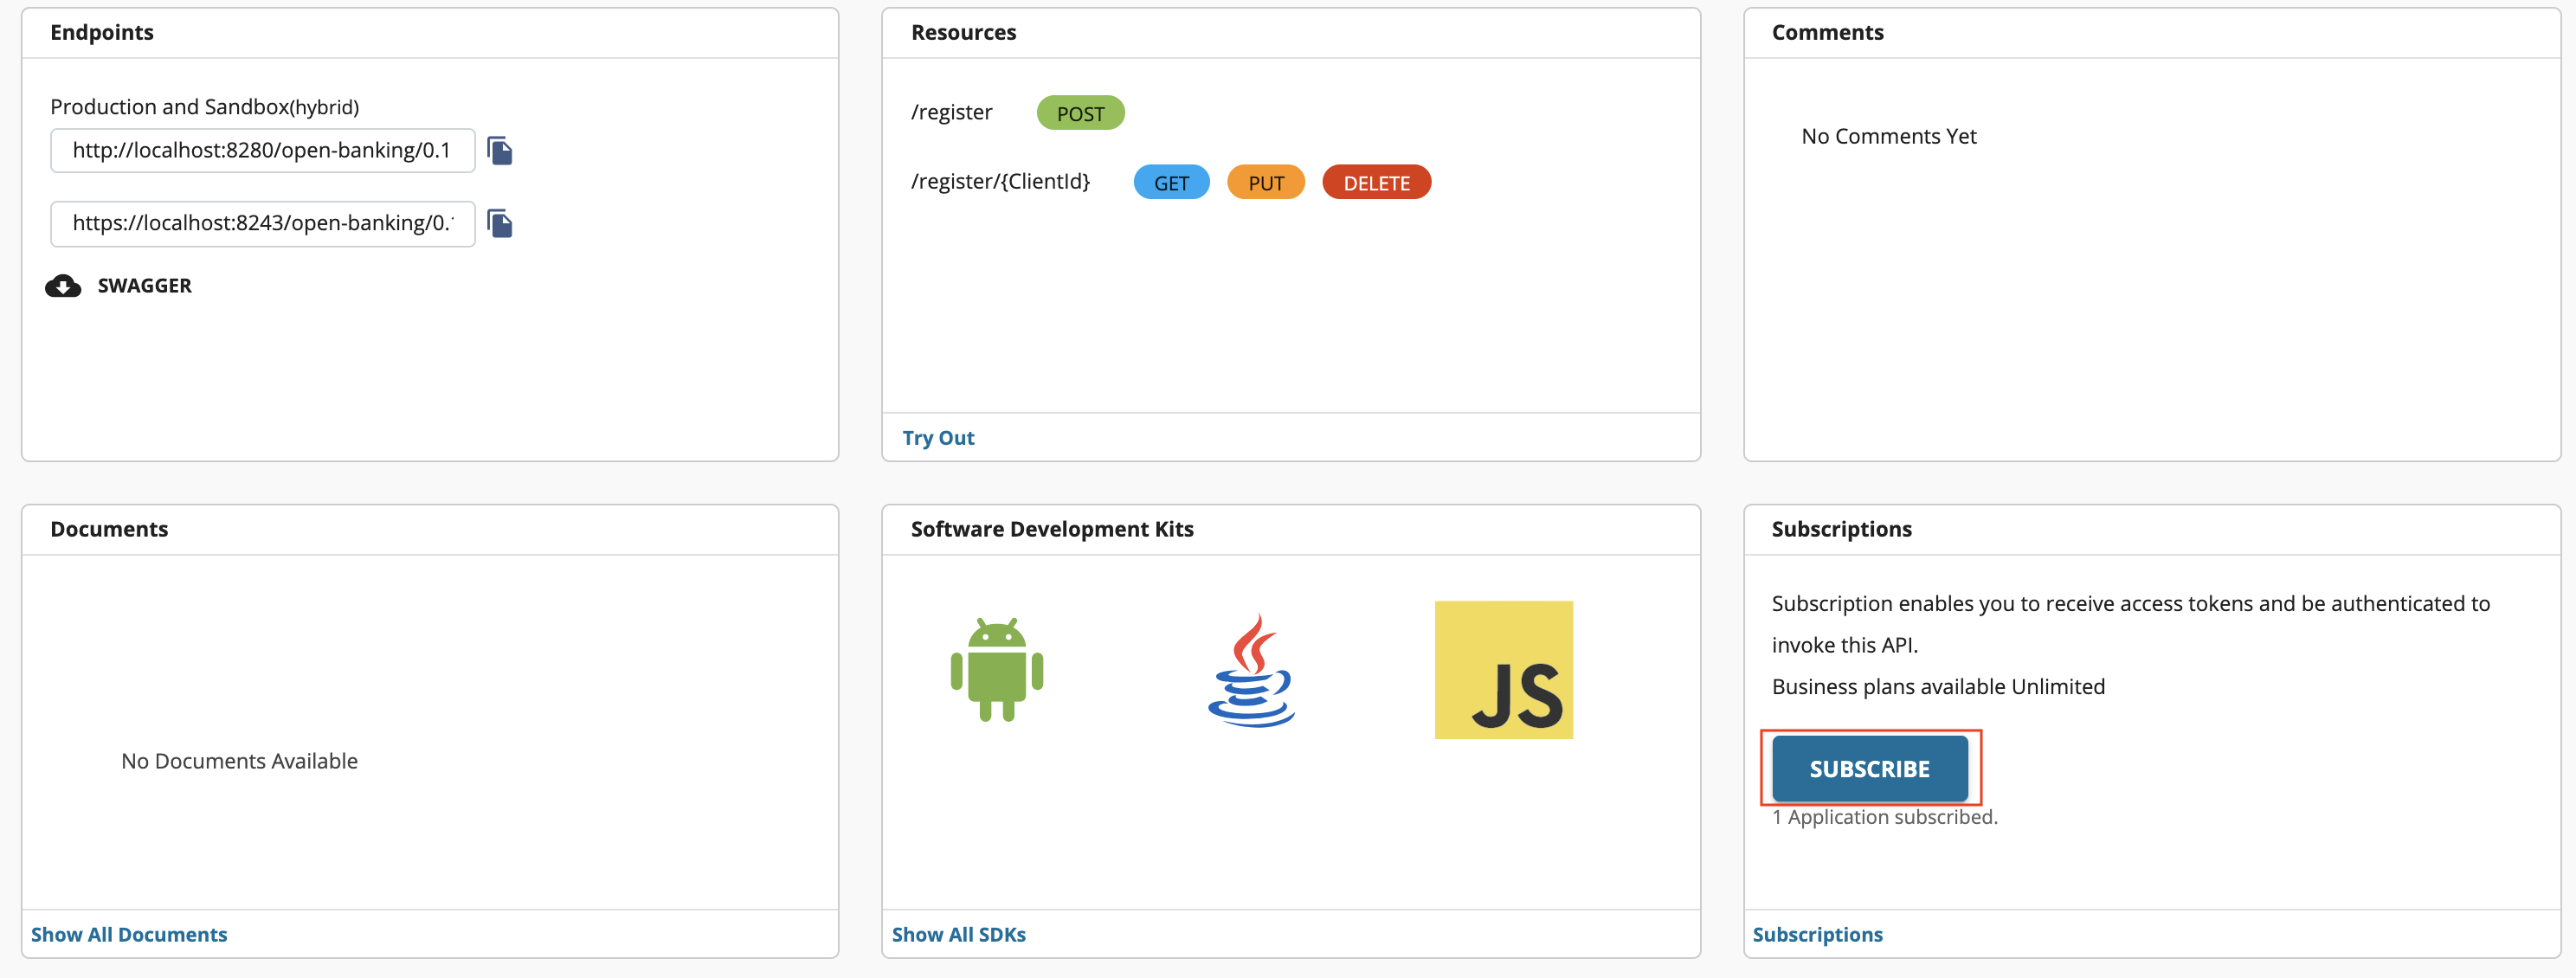
Select the AccountandTransaction V3.1 API and locate Subscriptions. Then, click Subscribe.
-
From the dropdown list, select the application you created using the DCR API and click Subscribe.
Step 1: Generate application access token
-
Once you register the application, generate an application access token using the following command. For the Transport Layer Security purposes in this sample flow, you can use the attached private key and public certificate.
curl -X POST \ https://localhost:9446/oauth2/token \ --cert <TRANSPORT_PUBLIC_KEY_FILE_PATH> --key <TRANSPORT_PRIVATE_KEY_FILE_PATH> \ -d 'grant_type=client_credentials&scope=accounts%20openid&client_assertion_type=urn:ietf:params:oauth:client-assertion-type:jwt-bearer&client_assertion=<CLIENT_ASSERTION_JWT>&redirect_uri=www.wso2.com&client_id=<CLIENT_ID>'- The request payload contains a client assertion JWT:
eyJraWQiOiJoM1pDRjBWcnpnWGduSENxYkhiS1h6emZqVGciLCJhbGciOiJQUzI1NiJ9.eyJzdWIiOiJTNnUySGU0anl3dnl5cFQ3ZkdZRXhMU3lwUVlhIiwiYXVkIjoiaHR0cHM6Ly9sb2NhbGhvc3Q6OTQ0Ni9vYXV0aDIvdG9rZW4iLCJpc3MiOiJTNnUySGU0anl3dnl5cFQ3ZkdZRXhMU3lwUVlhIiwiZXhwIjoxNzU3MjMzNTg4LCJpYXQiOjE2OTQwNzUxODgsImp0aSI6IjE0In0.ckHGWvntah1Rk2rcV_VRBNJbxrmcMxv6xk1ddOQoLrL7SF8NHQVCFKs8M_yFtkZ-WVuPWfWa4daEZmjgr42FA6PV1cKuUINYecopVyNMxjvmsARd_6PzJIJZAh4b211avbHk2wkpBtrXGG7wGTmAQOshJRSODeYaa-IDzbqi6NFA7MDoAm2d8ObQvbieXmE1MOVGJLV6Sk9HbJJrV2D03VTQ_WXP6by-AhwdLYFjLhO7SUcHyZIVzf5Gfb2AtaWLURy8bHzlipLglLm3x8erzuW7QoYSZ2Ntc3ULW16pwHxlKA2w8-UIy2mpjblo29eQFZFrWZ2cZCjrwbxQq_plPQ{ "alg": "<<The algorithm used for signing.>>", "kid": "<<The KID value of the signing jwk set>>", "typ": "JWT" } { "iss": "<<This is the issuer of the token. For example, client ID of your application>>", "sub": "<<This is the subject identifier of the issuer. For example, client ID of your application>>", "exp": <<This is epoch time of the token expiration date/time>>, "iat": <<This is epoch time of the token issuance date/time>>, "jti": "<<This is an incremental unique value>>", "aud": "<<This is the audience that the ID token is intended for. For example, https://<IS_HOST>:9446/oauth2/token>>" } <signature: For DCR, the client assertion is signed by the private key of the signing certificate. Otherwise the private signature of the application certificate is used.> -
Upon successful token generation, you obtain a token as follows:
{
 "access_token": "eyJ4NXQiOiJNR0l4TVRrMlpXTTJaVEZqTmpOall6WXdOV0ZsWm1OalpHWTRabVk0T1RVd1l6ZGhNRFF4TnciLCJraWQiOiJaREJoT1RjMlpqZzNZV0poWVdVelpUWXlNbVJrWm1JM09EbGpOalV5TXpBd01UYzFObUppTmpnNE56SmxOMlJsT0RFMVpHUTJNVEJqTmpZek9ETmtNQV9SUzI1NiIsImFsZyI6IlJTMjU2In0.eyJzdWIiOiJhZG1pbkB3c28yLmNvbUBjYXJib24uc3VwZXIiLCJhdXQiOiJBUFBMSUNBVElPTiIsImF1ZCI6IjE5X0ZUYkF2YlptOVlDOVFSQll3OEUwaFZuQWEiLCJuYmYiOjE2NDM1MzYzNTgsImF6cCI6IjE5X0ZUYkF2YlptOVlDOVFSQll3OEUwaFZuQWEiLCJzY29wZSI6ImFjY291bnRzIiwiaXNzIjoiaHR0cHM6XC9cL2xvY2FsaG9zdDo5NDQ2XC9vYXV0aDJcL3Rva2VuIiwiY25mIjp7Ing1dCNTMjU2IjoidllvVVlSU1E3Q2dvWXhOTVdXT3pDOHVOZlFyaXM0cFhRWDBabWl0Unh6cyJ9LCJleHAiOjE2NDM1Mzk5NTgsImlhdCI6MTY0MzUzNjM1OCwianRpIjoiNzFmOTE5ZWYtMDYwNC00Mjk4LWI1MjktMGZlYTYwYjE2NjhkIn0.hQdwoC9enYm3Ae4VXJKVB8dSthu5YhWSraWkCHYXyJDrqtl5A2IMlhiXGdg1MDCyU5IRsD-kggm6Tv2qJUteiLKI0rOYxgOIWloyxzkBY9iXJDzNmlhotMQfHJZCaUYpfZEJmi4K-MP1OQiZHaE-owv03mHBxIFum45og6I2iJLJwn7nhmowQqh_x9wF296gGFIVcO0_cSyvLCa42LLjhcjBTVmRIYTUiBfcfu63ld8n6M7BWXMKR7z5rDmKFSn9ROsc4H7CO36APL9QfzWTMMVBUKKQFb3bMrPwFRvMMtfOT_27JpBvIWIF7kh4Mav3t680higBRBUajco12NgNAw",
 "scope": "accounts",
 "token_type": "Bearer",
 "expires_in": 3600
}
Step 2: Initiate a consent
In this step, the API consumer creates a request to get the consent of the customer to access the accounts and its information from the bank.
A sample consent initiation request looks as follows. You can try out this sample flow with the transport certificates available here:
curl --location --request POST 'https://<APIM_HOST>:8243/open-banking/v3.1/aisp/account-access-consents' \
--header 'Authorization: Bearer <APPLICATION_ACCESS_TOKEN>' \
--header 'Content-Type: application/json' \
--cert <TRANSPORT_PUBLIC_KEY_FILE_PATH> --key <TRANSPORT_PRIVATE_KEY_FILE_PATH> \
--data-raw '{
   "Data":{
      "Permissions":[
         "ReadAccountsDetail",
         "ReadTransactionsDetail",
         "ReadBalances"
      ],
      "ExpirationDateTime":"2021-09-02T00:00:00+00:00",
      "TransactionFromDateTime":"2021-01-01T00:00:00+00:00",
      "TransactionToDateTime":"2021-03-03T00:00:00+00:00"
   },
   "Risk":{

   }
}'{
"consentId": "3e31f726-b9ad-43a7-897d-fcdf5e6d8cd0",
"Risk": {},
"Data": {
"TransactionToDateTime": "2021-03-03T00:00:00+00:00",
"ExpirationDateTime": "2021-09-02T00:00:00+00:00",
"Permissions": [
"ReadAccountsDetail",
"ReadTransactionsDetail",
"ReadBalances"
],
"TransactionFromDateTime": "2021-01-01T00:00:00+00:00"
}
}Step 3: Authorizing a consent
The API consumer application redirects the bank customer to authenticate and approve/deny application-provided consents.
-
Generate a request object by signing your JSON payload using the supported algorithms.
Click here to see a sample request object...
- Given below is a sample request object in the JWT format:
eyJraWQiOiJoM1pDRjBWcnpnWGduSENxYkhiS1h6emZqVGciLCJhbGciOiJQUzI1NiIsInR5cCI6IkpXVCJ9.eyJtYXhfYWdlIjo4NjQwMCwiYXVkIjoiaHR0cHM6Ly9sb2NhbGhvc3Q6OTQ0Ni9vYXV0aDIvdG9rZW4iLCJzY29wZSI6ImFjY291bnRzIG9wZW5pZCIsImlzcyI6IlM2dTJIZTRqeXd2eXlwVDdmR1lFeExTeXBRWWEiLCJjbGFpbXMiOnsiaWRfdG9rZW4iOnsiYWNyIjp7InZhbHVlcyI6WyJ1cm46b3BlbmJhbmtpbmc6cHNkMjpzY2EiLCJ1cm46b3BlbmJhbmtpbmc6cHNkMjpjYSJdLCJlc3NlbnRpYWwiOnRydWV9LCJvcGVuYmFua2luZ19pbnRlbnRfaWQiOnsidmFsdWUiOiI4NmM4YTA4NS1hNDQ0LTQyZDUtYmU0My05NjhiMzY2YTU0NjciLCJlc3NlbnRpYWwiOnRydWV9fSwidXNlcmluZm8iOnsib3BlbmJhbmtpbmdfaW50ZW50X2lkIjp7InZhbHVlIjoiODZjOGEwODUtYTQ0NC00MmQ1LWJlNDMtOTY4YjM2NmE1NDY3IiwiZXNzZW50aWFsIjp0cnVlfX19LCJyZXNwb25zZV90eXBlIjoiY29kZSBpZF90b2tlbiIsInJlZGlyZWN0X3VyaSI6Imh0dHBzOi8vd3d3Lmdvb2dsZS5jb20vIiwic3RhdGUiOiJZV2x6Y0Rvek1UUTIiLCJleHAiOjE3NTcyMzM1ODgsIm5vbmNlIjoibi0wUzZfV3pBMk1qIiwiY2xpZW50X2lkIjoiUzZ1MkhlNGp5d3Z5eXBUN2ZHWUV4TFN5cFFZYSJ9.mClPy-6g0Kn3JIF8P7odd-PiWYCSDhVyQJqn9SkHAXo07saGYD-YxQcqfghRnUbYc41SyAwtkw4bfbNLpqLFnmJsBiP3XjjDE0YwKwD4UXFMAac4zW9ooQtzr_5qXkGS5nNpua7KtpvNezNBgS5-c4MjuI6nUxL63rgmZyRoDlrK_Uxgx4CSxmJQkcHP8YzNvCVxe9ftpuKUlanCCgNvGg2ocmwpRP1G1-ZBr2e3nIfGsFxSaX-4vkur4chEyjk5YogfoxjnG1UjvP_al9M07W0J-eysviGMNqzJ7LDIVCDp5ZKrOnf1p_zPLE4No3xV8cN1ZTJJ_ufUABhJTYQKEw{ "kid": "<The KID value of the signing jwk set>", "alg": "<SUPPORTED_ALGORITHM>", "typ": "JWT" } { "max_age": 86400, "aud": "<This is the audience that the ID token is intended for. Example, https://<IS_HOST>:9446/oauth2/token>", "scope": "accounts openid", "iss": "<CLIENT_ID>", "claims": { "id_token": { "acr": { "values": [ "urn:openbanking:psd2:sca", "urn:openbanking:psd2:ca" ], "essential": true }, "openbanking_intent_id": { "value": "<CONSENTID>", "essential": true } }, "userinfo": { "openbanking_intent_id": { "value": "<CONSENTID>", "essential": true } } }, "response_type": "code id_token", "redirect_uri": "<CLIENT_APPLICATION_REDIRECT_URI>", "state": "YWlzcDozMTQ2", "exp": <The expiration time of the request object in Epoch format>, "nonce": "<PREVENTS_REPLAY_ATTACKS>", "client_id": "<CLIENT_ID>" } -
The bank sends the request to the customer stating the accounts and information that the API consumer wishes to access. This request is in the format of a URL as follows:
https://localhost:9446/oauth2/authorize?response_type=code%20id_token&client_id=S6u2He4jywvyypT7fGYExLSypQYa&redirect_uri=https://wso2.com&scope=openid accounts&state=0pN0NBTHcv&nonce=jBXhOmOKCB&request=<REQUEST_OBJECT>https://<IS_HOST>:9446/oauth2/authorize?response_type=code%20id_token&client_id=<CLIENT_ID>&scope=accounts%20op enid&redirect_uri=<APPLICATION_REDIRECT_URI>&state=YWlzcDozMTQ2&request=<REQUEST_OBJECT>&prompt=login&nonce=<REQUEST_OBJECT_NONCE> -
Run the URL in a browser to prompt the invocation of the authorize API.
-
Upon successful authentication, the user is redirected to the consent authorize page. Use the login credentials of a user that has a
subscriberrole. -
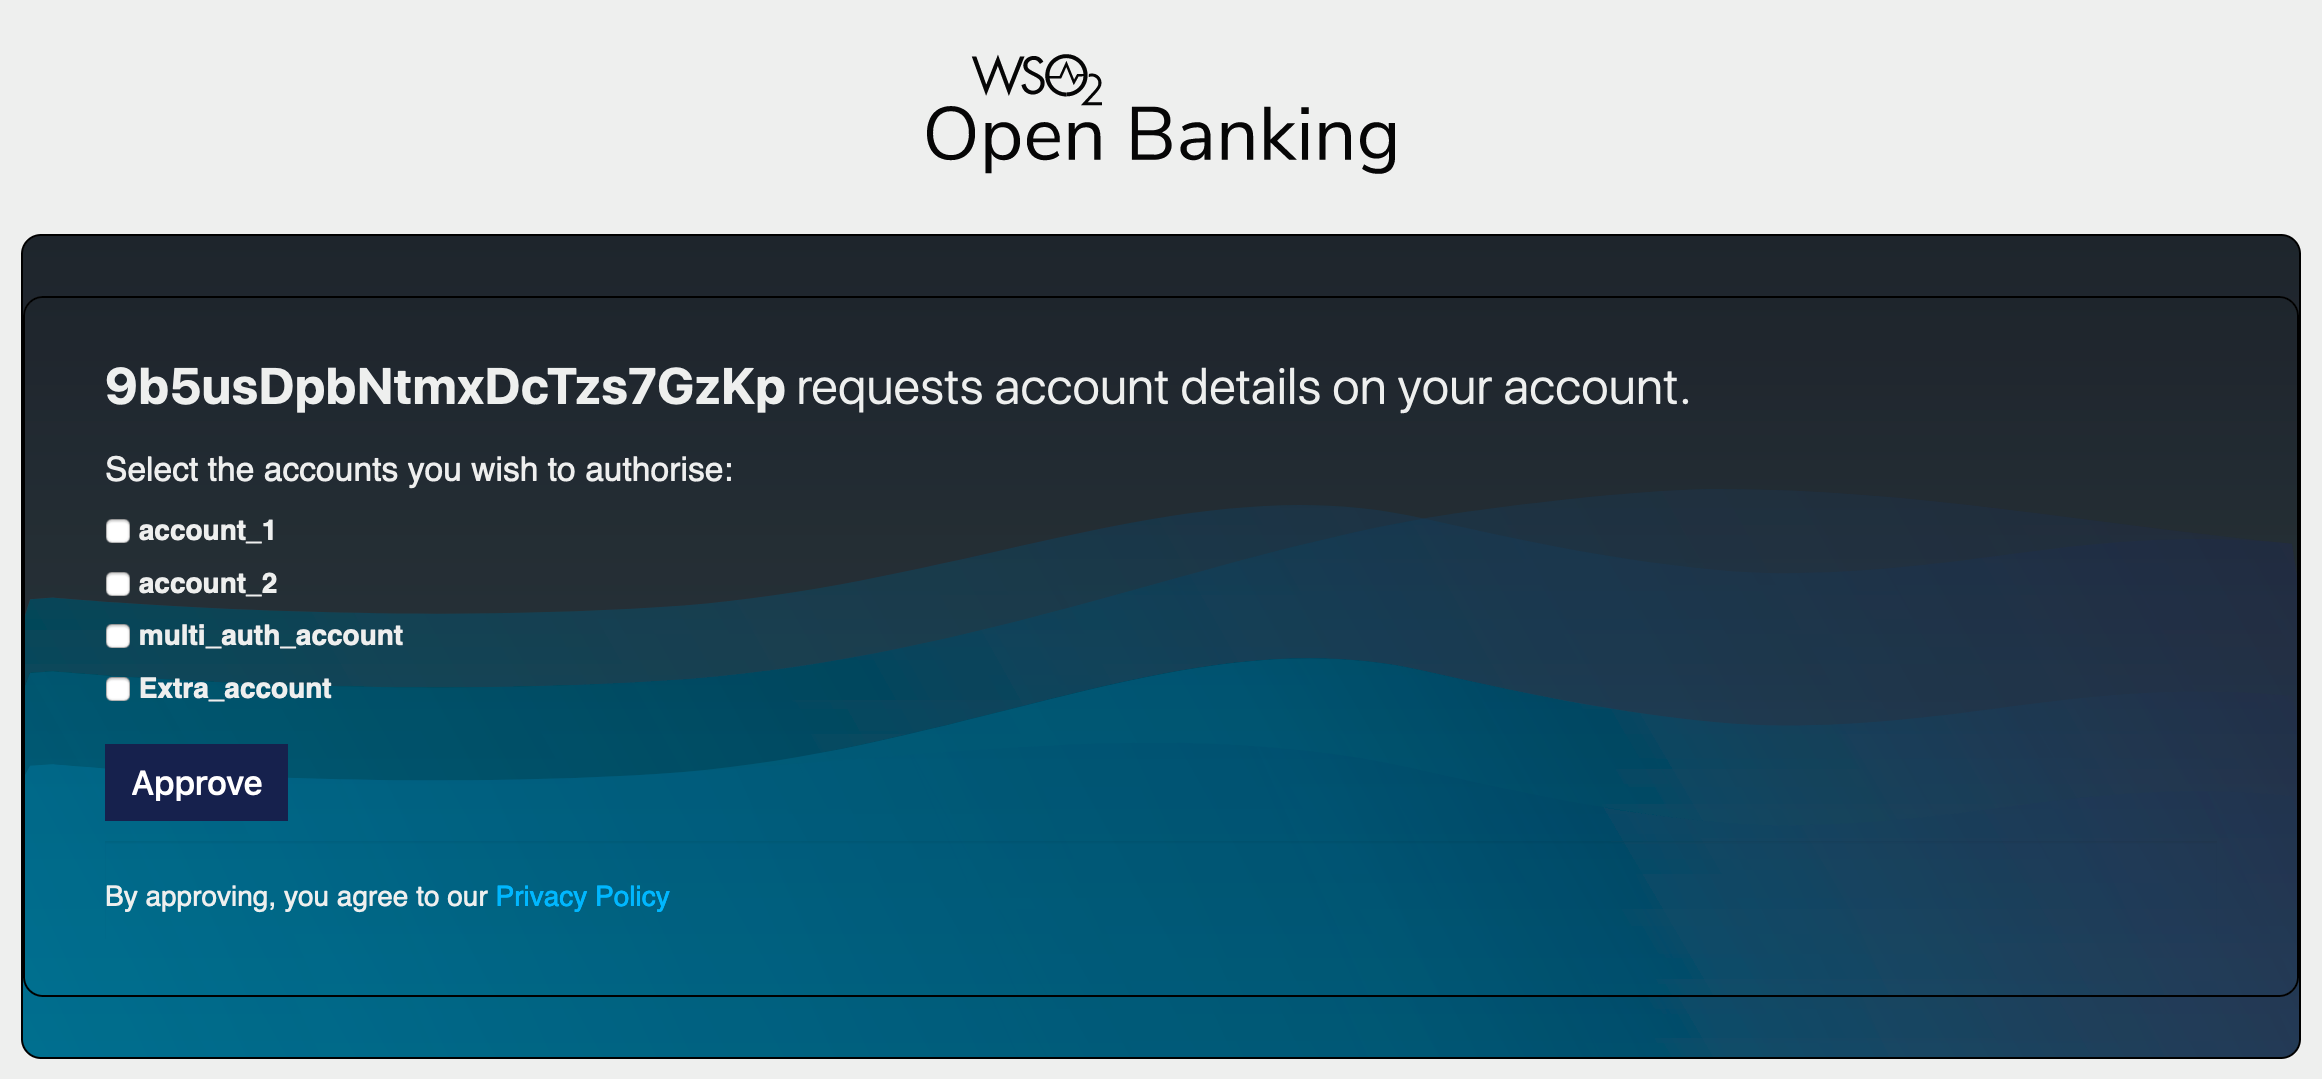
The page displays a list of bank accounts and the information that the API consumer wishes to access.
-
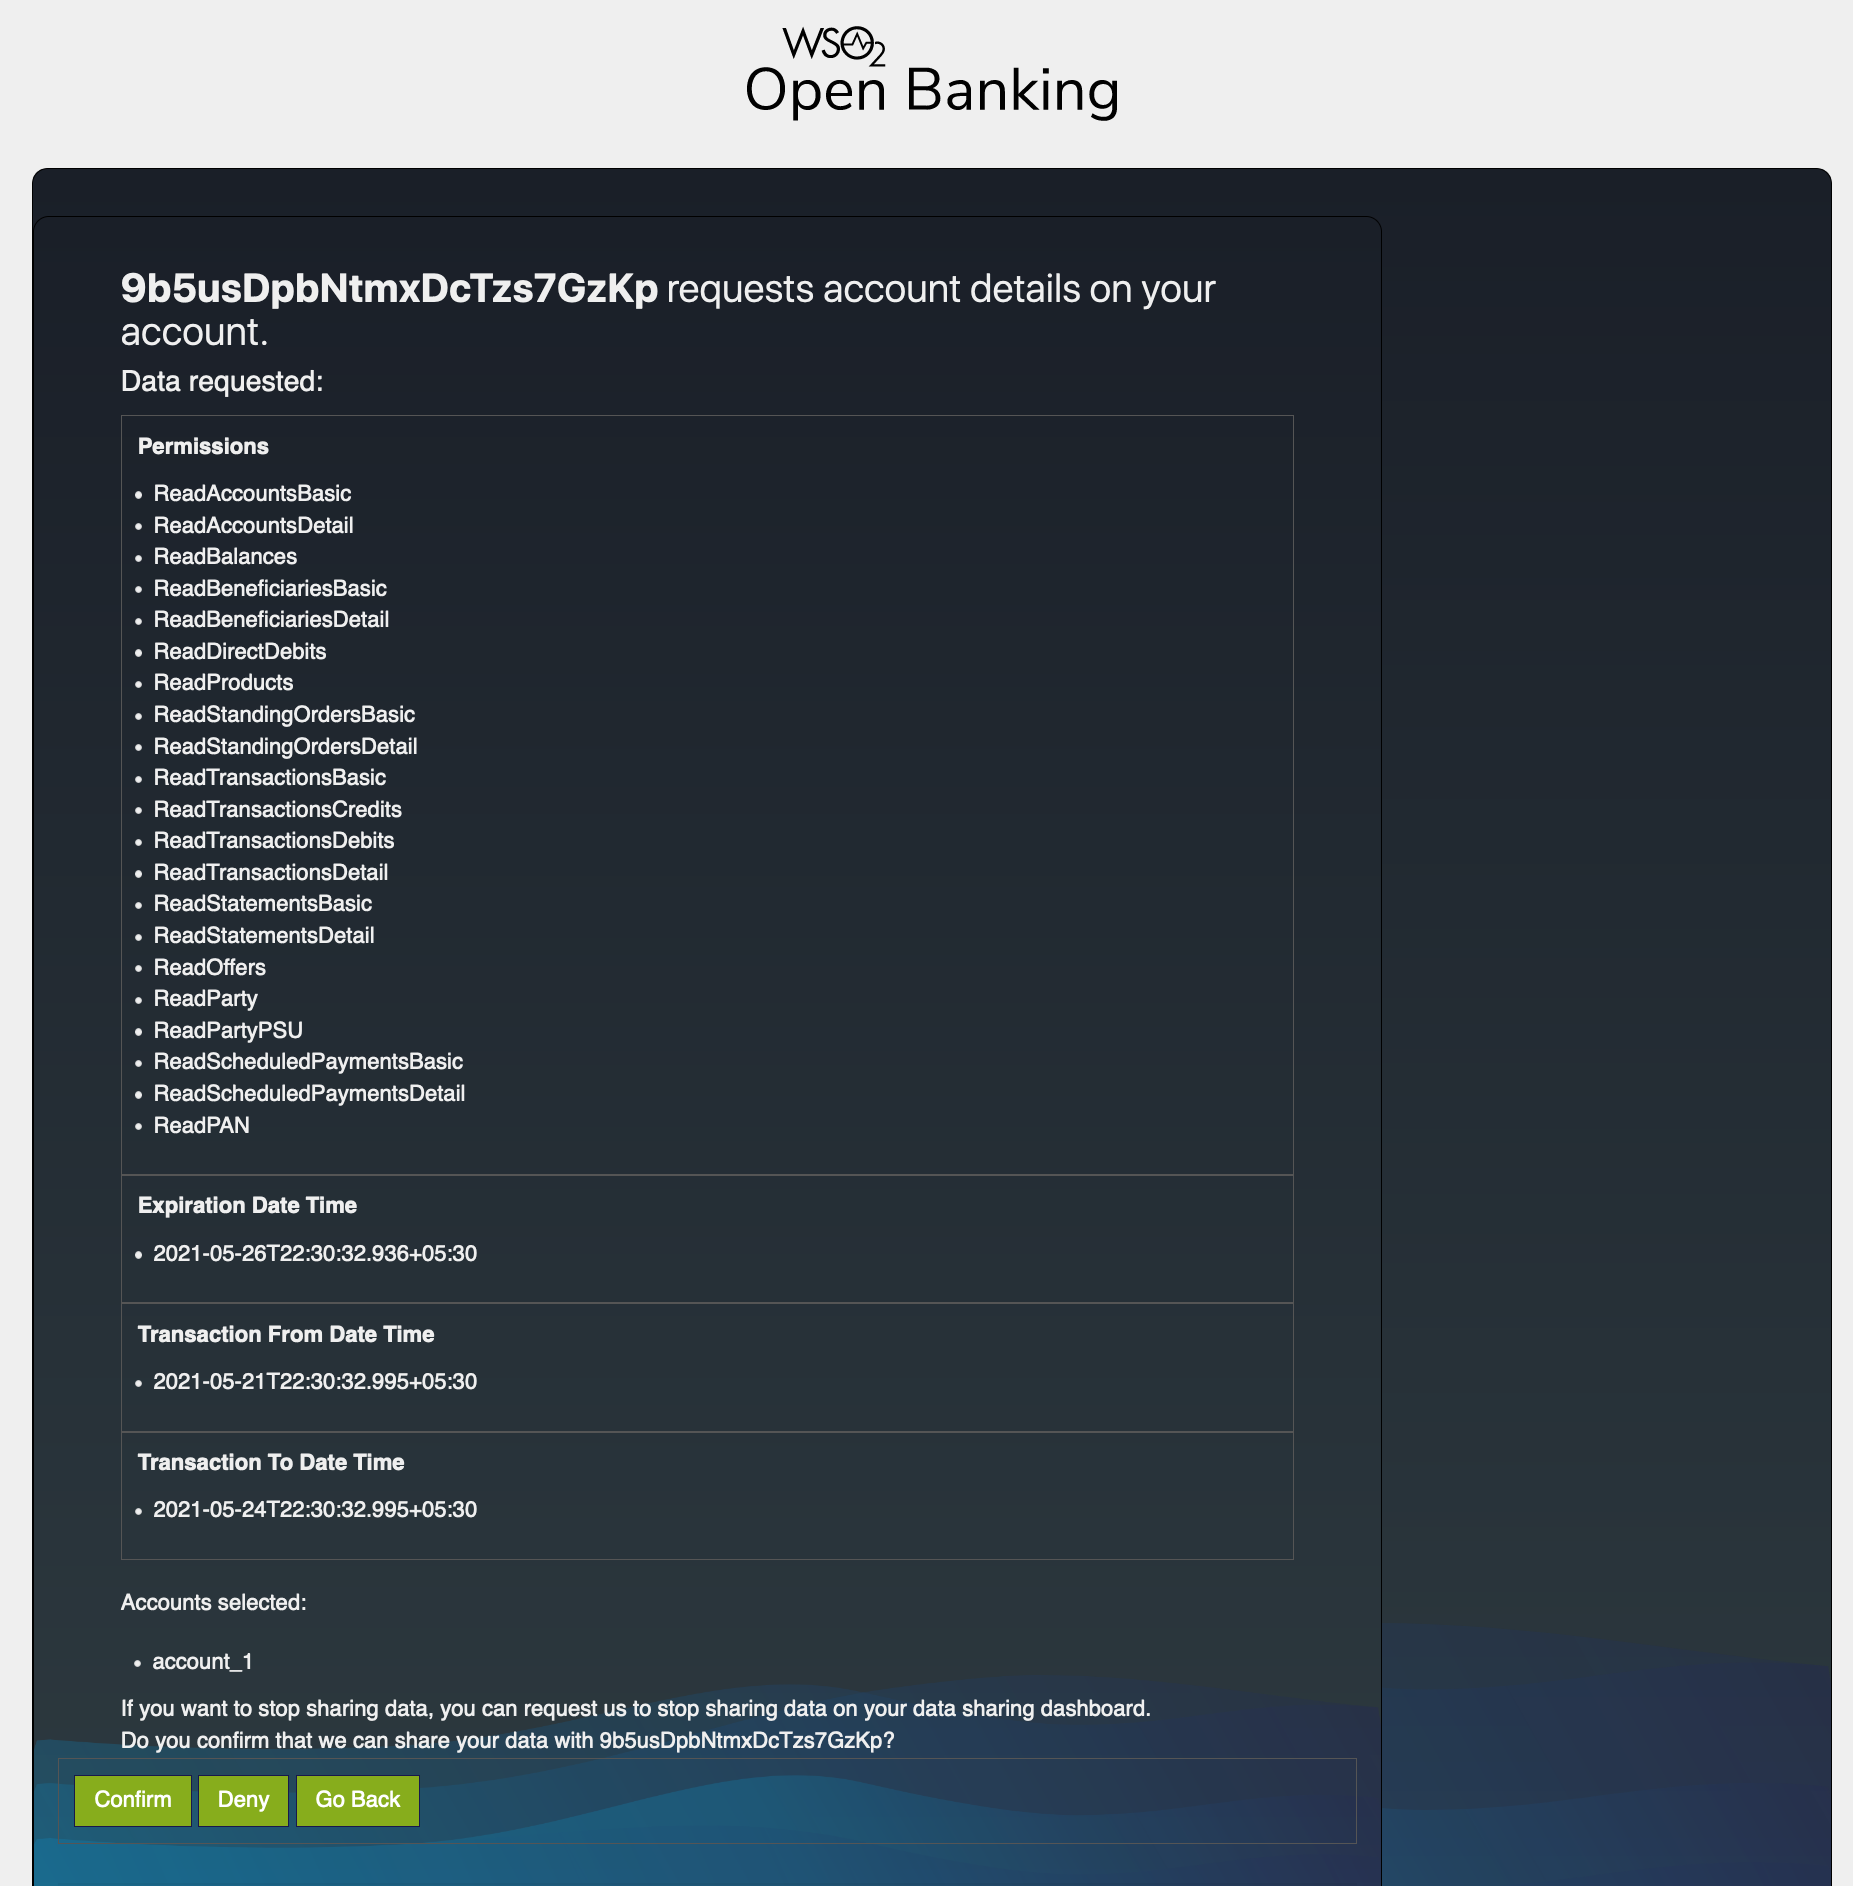
Data requested by the consent such as permissions, transaction period, and expiration date are displayed. Click Confirm to grant these permissions.
-
Upon providing consent, an authorization code is generated on the web page of the
redirect_uri. See the sample given below:The authorization code from the below URL is in the code parameter (
code=e61579c3-fe9c-3dfe-9af2-0d2f03b95775).https://wso2.com/#code=e61579c3-fe9c-3dfe-9af2-0d2f03b95775&id_token=eyJ4NXQiOiJNell4TW1Ga09HWXdNV0kwWldObU5EY3hOR1l3WW1 NNFpUQTNNV0kyTkRBelpHUXpOR00wWkdSbE5qSmtPREZrWkRSaU9URmtNV0ZoTXpVMlpHVmxOZyIsImtpZCI6Ik16WXhNbUZrT0dZd01XSTBaV05tTkRjeE5 a4f936c74e2ca7f4250208aa42.sk_04ejciXBj6DnpALyYaw
Step 4: Generate user access token
-
You can generate a user access token using the sample request given below:
curl -X POST \ https://localhost:9446/oauth2/token \ -H 'Cache-Control: no-cache' \ -H 'Content-Type: application/x-www-form-urlencoded' \ --cert <PUBLIC_KEY_FILE_PATH> --key <PRIVATE_KEY_FILE_PATH> \ -d 'grant_type=authorization_code&client_assertion_type=urn%3Aietf%3Aparams%3Aoauth%3Aclient-assertion-type%3Ajwt-bearer&client_assertion=<CLIENT_ASSERTION>&code=4dc73435-eee5-3486-ba3b-29b49be04f21&scope=openid%20accounts&redirect_uri=https%3A%2F%2Fwso2.com' -
The
client_assertionparameter is a JWT as explained in the Generating an application access token step. -
Update all parameters and use the authorization code you generated in the previous step as
code. -
The response contains a user access token.
Step 5: Invoke Accounts Information Service API
The API consumer can now invoke the GET/ accounts/<ACCOUNT_ID> endpoint available in the sample Account Information
Service API.
Note
In a real-life open banking environment, the API consumer applications can retrieve details of accounts for which the bank customer has granted them consent.
- A sample request looks as follows:
curl -X GET \ https://localhost:8243/open-banking/v3.1/aisp/accounts/1 \ -H 'x-fapi-financial-id: open-bank' \ -H 'Authorization: Bearer <USER_ACCESS_TOKEN>' \ -H 'Accept: application/json' \ -H 'charset: UTF-8' \ -H 'Content-Type: application/json; charset=UTF-8' --cert <PUBLIC_KEY_FILE_PATH> --key <PRIVATE_KEY_FILE_PATH> \ -
The request retrieves the account information for the Account ID you mentioned in the request.
Note
This is a sample response generated by the mock back end available in WSO2 Open Banking.
{
   "Data":{
      "Account":[
         {
            "AccountId":"1",
            "Status":"Enabled",
            "StatusUpdateDateTime":"2020-04-16T06:06:06+00:00",
            "Currency":"GBP",
            "AccountType":"Personal",
            "AccountSubType":"CurrentAccount",
            "Nickname":"Bills",
            "Account":[
               {
                  "SchemeName":"SortCodeAccountNumber",
                  "Identification":"1",
                  "Name":"Mr Kevin",
                  "SecondaryIdentification":"00021"
               }
            ]
         }
      ]
   },
   "Links":{
      "Self":"https://api.alphabank.com/open-banking/v3.0/accounts/1"
   },
   "Meta":{
      "TotalPages":1
   }
}