Ciba set up flow
Before you begin:
-
Follow the Quick Start Guide and set up the base products and accelerators.
-
Upload the root and issuer certificates in OBIE (Sandbox certificates/ Production certificates) to the client trust stores in
<APIM_HOME>/repository/resources/security/client-truststore.jksand<IS_HOME>/repository/resources/security/client-truststore.jksusing the following command:keytool -import -alias <alias> -file <certificate_location> -storetype JKS -keystore <truststore_location> -storepass wso2carbon -
Restart the Identity Server and API Manager instances.
- Update the keystore of the Identity Server to establish communication between the server and the mobile phone.
- To communicate with devices in the same local network, use the IP of each device.
- Update the keystore certificate with private IP of the Identity Server as the Subject Alternative Name (SAN).
-
Create a new keystore at
<IS_HOME>/repository/resources/securityand use the IP you configured above. For example:keytool -genkey -alias wso2carbon -keyalg RSA -keystore wso2carbon.jks -keysize 2048 -ext SAN="IP:192.168.8.193,DNS:localhost" -
Export the public key from the new keystore
keytool -exportcert -alias wso2carbon -keystore wso2carbon.jks -rfc -file wso2carbon.pem -
Import the above public certificate to the truststore of Identity Server and API Manager.
keytool -import -alias wso2is -file wso2carbon.pem -keystore client-truststore.jks -storepass wso2carbon -
Deploy the Dynamic Client Registration (DCR) API and change the endpoint configuration with the IP address of the Identity Server.
- When Configuring IS as Key Manager, change the hostnames of the URLs to the IP address above.
- Open the
<IS_HOME>/repository/conf/deployment.tomlfile. - Update the following configuration with the JWKS URL of the certificates that you will use to sign the SSA for DCR.
[open_banking.dcr]
jwks_url_sandbox = "https://keystore.openbankingtest.org.uk/0015800001HQQrZAAX/ykNOgWd2RgnuoLRRyWBkaY.jwks"
jwks_url_production = "https://keystore.openbankingtest.org.uk/0015800001HQQrZAAX/ykNOgWd2RgnuoLRRyWBkaY.jwks"
Try out CIBA Auth WebLink Flow
CIBA Auth WebLink flow can be used to send the auth web link as a notification (Ex: SMS, Email) to the user's mobile device. User use the weblink to go through the authentication and authorization flow. This flow can be used with multiple user authorization scenarios as well. Below are the main steps involved in the flow,
Create an application using DCR
Include the CIBA grant type in the DCR request object as follows:
  "grant_types": [
     "client_credentials",
     "authorization_code",
     "refresh_token",
     "urn:ietf:params:oauth:grant-type:jwt-bearer",
     "urn:openid:params:grant-type:ciba"
   ],
Initiate a consent
Please refer to the Step 1 and 2 in the try-out-flow.md for the more information on initiation of the consent.
Sending CIBA Request
-
Invoke the CIBA request available in the Postman collection.
login_hintparameter inside the request object is default set to identify the user's email.- Behaviour of this value can be customised by extending the
com.wso2.openbanking.accelerator.consent.extensions.ciba.authenticator.weblink.CIBAWebLinkAuthenticatorExtensionImplclass and overriding it's methods. - Please refer to
Custom CIBA Weblink Extension pointssection for more information.
-
The response is as follows:
{ "auth_req_id":"293c00d5-b318-484b-8f7a-54b1048a4832", "interval":2, "expires_in":3600 } -
At the same time, SMS notification with Auth WebLink should receive to user's mobile device. Click it and open in mobile browser.
com.wso2.openbanking.accelerator.consent.extensions.ciba.authenticator.weblink.notification.provider.SMSNotificationProviderclass is responsible to send the SMS service request, For customisations we can extendSMSNotificationProvideror create new class by implementingNotificationProvider.- Please refer to
Custom CIBA Weblink Extension pointssection for more information.
-
Provide approval for the consent as guided by the application.
Retrieving Access Token
-
After receiving the above response for the CIBA request, you can poll the token endpoint to get the access token. Until the user provides the approval via the auth flow in mobile browser, you will receive a response indicating pending authorization.
-
Once the user completes and submits the approval, the token will be returned.
Assumptions
- User's mobile number should be configured.
- Users will receive the notification as web links to authenticate and authorize the consent.
- For multiple users involved scenarios, Identity server will assume only one user is authenticated (ID Token will contain the details of only one user (Ex: Primary user) ) and the OB consent tables will contain the authentication status of other users. (This user's identity can be customised by extending and overriding
OBCibaResponseTypeHandler.issue()method.)
Setting up flow
- Follow the Quick Start Guide and set up the base products and accelerators.
- Open the
<IS_HOME>/repository/conf/deployment.tomlfile: -
Add the following under the
[[resource.access_control]]tags:[[resource.access_control]] context="(.*)/oauth2/ciba(.*)" secure="false" http_method="all" -
Register
urn:openid:params:grant-type:cibaas a custom grant type:[[oauth.custom_grant_type]] name="urn:openid:params:grant-type:ciba" grant_handler="com.wso2.openbanking.accelerator.identity.grant.type.handlers.OBCibaGrantHandler" grant_validator="org.wso2.carbon.identity.oauth.ciba.grant.CibaGrantValidator" [oauth.custom_grant_type.properties] IdTokenAllowed=true -
Add the following custom response type:
[[oauth.custom_response_type]] name = "cibaAuthCode" class = "com.wso2.openbanking.accelerator.identity.auth.extensions.response.handler.OBCibaResponseTypeHandler" validator = "com.wso2.openbanking.accelerator.identity.auth.extensions.response.validator.OBCibaResponseTypeValidator" -
Add CIBA request object validator:
[oauth.oidc.extensions] ciba_request_object_validator="com.wso2.openbanking.accelerator.identity.auth.extensions.request.validator.OBCIBARequestObjectValidationExtension" -
Change consent steps in
<IS_HOME>/repository/conf/deployment.toml, -
Add
com.wso2.openbanking.accelerator.consent.extensions.authorize.impl.CIBAConsentPersistStep,com.wso2.openbanking.accelerator.consent.extensions.authorize.impl.CIBAWebAuthLinkConsentPersistStepand set its priority to 2 and 3. Update the priority of other steps accordingly.[[open_banking.consent.authorize_steps.persist]] class = "com.wso2.openbanking.accelerator.consent.extensions.authorize.impl.CIBAConsentPersistStep" priority = 2 [[open_banking.consent.authorize_steps.persist]] class = "com.wso2.openbanking.accelerator.consent.extensions.authorize.impl.CIBAWebAuthLinkConsentPersistStep" priority = 3 -
Configuring CIBA Web Link Authenticator
- This section provides sample configurations and resources to configure a service provider application to support both CIBA and redirect based flows such as
code id_token. -
CIBA Web Link Authenticator will send the auth weblinks to the users, Upon clicking, these links will go through auth flow in the browser of user's mobile devices.
- Sign in to WSO2 Identity Server Management Console at
https://<IS_HOST>:9446/carbon. - On the Main tab, click Home > Identity > Identity Providers > Add.
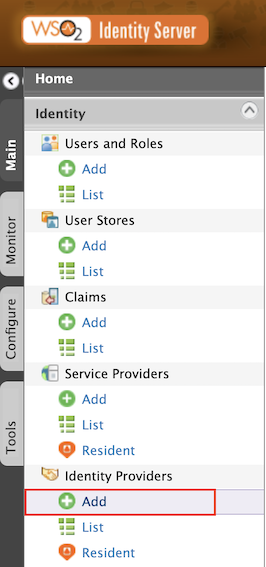
- Give
Identity Provider NameasCIBA-Weblink. - Expand Federated Authenticators > CIBA Web Link Authenticator Configuration.
- Select both the Enable and Default checkboxes. This is to enable and make the
CIBA-Weblinkauthenticator the default one.
- Sign in to WSO2 Identity Server Management Console at
-
Below two authenticator steps are needed to achive both CIBA and redirect based flows :
- Step 1: Basic Authenticator - for all browser based authentication flows.
- Step 2: CIBA Web Link Authenticator - for CIBA flow
-
Open
<IS_HOME>/repository/conf/deployment.tomlfile and add the following configs:``` toml [open_banking.sca.primaryauth] name = "BasicAuthenticator" display = "basic" [open_banking.sca.idp] name = "CIBA-Weblink" ``` -
Open the
<IS_HOME>/repository/conf/common.auth.script.jsand update its content as follows:
- This section provides sample configurations and resources to configure a service provider application to support both CIBA and redirect based flows such as
   var psuChannel = 'Online Banking';
   var isCiba;
   var isCibaWebLink;

   function onLoginRequest(context) {
   var responseType = context.request.params.response_type[0];
   var CIBAWebLinkParam = context.request.params.ciba_web_auth_link;

   if (responseType.indexOf("cibaAuthCode") >= 0) {
       isCiba = true;
   } else {
       isCiba = false;
   }

   if (CIBAWebLinkParam != null) {
       isCibaWebLink = true;
   } else {
       isCibaWebLink = false;
   }

   if (!isCiba) {
       executeStep(1, {
           onSuccess: function (context) {
               publishAuthData(context, "AuthenticationSuccessful", {'psuChannel': psuChannel});
           },
           onFail: function (context) {
               publishAuthData(context, "AuthenticationFailed", {'psuChannel': psuChannel});
           }
       });
   } else {
        if (isCibaWebLink) {
            executeStep(1, {
               onSuccess: function (context) {
                   publishAuthData(context, "AuthenticationSuccessful", {'psuChannel': psuChannel});
               },
               onFail: function (context) {
                   publishAuthData(context, "AuthenticationFailed", {'psuChannel': psuChannel});
               }
           });
        } else {
            executeStep(2, {
               onSuccess: function (context) {
                   publishAuthData(context, "AuthenticationSuccessful", {'psuChannel': psuChannel});
               },
               onFail: function (context) {
                   publishAuthData(context, "AuthenticationFailed", {'psuChannel': psuChannel});
               }
           });
        }
    }
}- Adding SMS Notification provider configurations.
- Accelerator default uses the SMSNotificationProvider to send the Auth WebLink to the user's mobile phone. However, this can be customised by creating
CustomNotificationProviderby implementingNotificationProvider. - Below are the default configurations to be added in
<IS_HOME>/repository/conf/deployment.tomlfile to send the Auth WebLink via SMS.
[[event_handler]]
name= "cibaWebLinkNotificationHandler"
subscriptions =["CIBA_WEBLINK_NOTIFICATION_EVENT"]

[open_banking.identity.ciba.auth_web_link]
authenticator_extension = "com.wso2.openbanking.accelerator.consent.extensions.ciba.authenticator.weblink.CIBAWebLinkAuthenticatorExtensionImpl"
# allowed_auth_url_parameters parameter is used to filter the Auth WebLink URL parameters.
allowed_auth_url_parameters = ["client_id", "scope", "response_type", "nonce", "redirect_uri", "binding_message"]
# redirect_endpoint config defines the user's succesfull authorisations redirect endpoint. This page displays the succesful CIBA flow completions.
redirect_endpoint = "https://localhost:9446/authenticationendpoint/ciba.jsp"
# custom `NotificationProvider` extention can be added using below config.
notification_provider = "com.wso2.openbanking.accelerator.consent.extensions.ciba.authenticator.weblink.notification.provider.SMSNotificationProvider"

[open_banking.identity.ciba.auth_web_link.sms_notification]
# SMS service URL is added below.
sms_url = "https://localhost:9446/sample/sms/service"
# SMS service request headers can be defined as below.
[[open_banking.identity.ciba.auth_web_link.sms_notification.header]]
name = "Accept"
value = "application/json"
[[open_banking.identity.ciba.auth_web_link.sms_notification.header]]
name = "Authorization"
value = "**"
Custom CIBA Extension points
- Adding CIBA redirect endpoint.
- After successful authorisation user should be redirected to a page which displays the user to return back to originating device (Ex: PoS device).
- Refer to the sample display page
ciba.jspfile available here . -
Copy this file to
<IS_HOME>/repository/deployment/server/webapps/authenticationendpointlocation. -
CIBA WebLink Authenticator Extension Interface
-
This interface contains below methods for override in-order for customisations.
`generateWebAuthLink()` - Can be used to generate customised auth webLink URLs. `getAuthenticatedUsers()` - Can be used to customise identifying the users based on the login_hint parameter.- Accelerator default uses
com.wso2.openbanking.accelerator.consent.extensions.ciba.authenticator.weblink.CIBAWebLinkAuthenticatorExtensionImplfor the CIBA weblink auth flow. - To apply the customizations, Please update the
authenticator_extensionconfiguration in the[open_banking.identity.ciba.auth_web_link]section of the IS deployment.toml.
- Accelerator default uses
-
CIBA Notification Provider
-
This interface contains below methods to override in-order for customisations.
`setHeaders()` - Can be used to set custom headers in SMS service request. `getPayload()` - Can use to send custom payload via an SMS or to customise the SMS service request.- Accelerator default uses
com.wso2.openbanking.accelerator.consent.extensions.ciba.authenticator.weblink.notification.provider.SMSNotificationProviderto send the SMS notification. - To apply the customisations, Please update the
notification_providerconfiguration in the[open_banking.identity.ciba.auth_web_link]section of the IS deployment.toml
- Accelerator default uses
Multi auth user flows
For example of multi authorisation flow, we can think joint account scenario where all the users need to approve the consent. Below steps are mainly involved for multi auth user flows,
- Sending CIBA request with login_hint.
- Identifying multiple users involved in the CIBA request using the given
login_hint. - Sending auth weblinks via SMS for each user.
- Access token can only be retrieved after all users have approved the consents.
- Currently
getAuthenticatedUsers()method is identifying list of users (Ex:[email protected], [email protected]) , However this can be customised to identify users based on any input (Ex: Bank account number etc.)