Customize the Consent Manager Portal
Deprecated Documentation
This feature is deprecated and is only intended for migrating customers. Please transition to the OpenAPI based extensions for all new implementations.
This page explains how the developers can plug in the required toolkit code and customize the Consent Manager Portal by modifying or adding files.
Info
This is only available as a WSO2 Update from WSO2 Open Banking Identity Server Accelerator Level 3.0.0.77 onwards. For more information on updating, see Getting WSO2 Updates.
After setting up the required toolkit, the default Consent Manager application is overridden by the Consent Manager application specific to each toolkit. Follow the instructions below to customize the application furthermore.
Setting up the Consent Manager source code for advanced customizations
Info
The source code of the Consent Manager application is available in the <IS_HOME>/repository/deployment/server/webapps/consentmgr/self-care-portal-frontend directory.
Follow the instructions below to set up the source code for Consent Manager for advanced customizations.
-
Open a terminal.
-
Navigate to the
<IS_HOME>/repository/deployment/server/webapps/consentmgr/self-care-portal-frontenddirectory. -
Run the following command to install the dependencies required for the React project:
npm install -
Open the
<IS_HOME>/repository/deployment/server/webapps/consentmgr/self-care-portal-frontendfolder in your IDE.Note
If the
<IS_HOME>/repository/deployment/server/webapps/consentmgr/self-care-portal-frontenddirectory does not contain thetoolkit/srcpathway, create it. -
You can modify the existing components and/or add new components according to your requirements. Refer to the relevant section below for the instructions.
Modifying existing components in the Consent Manager application
-
Any file inside the
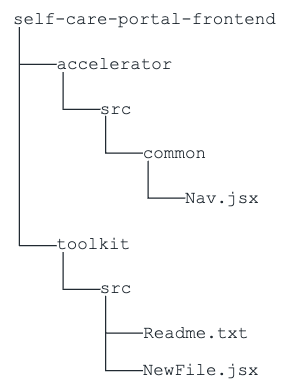
<IS_HOME>/repository/deployment/server/webapps/consentmgr/self-care-portal-frontend/toolkit/srcfolder can override the original file at the<IS_HOME>/repository/deployment/server/webapps/consentmgr/self-care-portal-frontend/accelerator/srcfolder. -
For example, the
self-care-portal-frontend/toolkit/src/common/Nav.jsxfile takes precedence over theself-care-portal-frontend/accelerator/src/common/Nav.jsxfile when the npm build is running.Note
The name of the file and the location relative to the source folder needs to be identical.
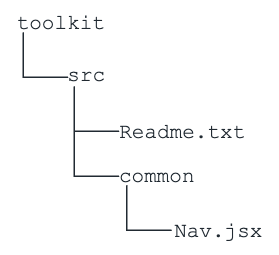
A sample structure of the <IS_HOME>/repository/deployment/server/webapps/consentmgr/self-care-portal-frontend/toolkit/src folder is shown below:
Important
The file extension is mandatory for any imports added. For example,
import { logout } from “../login/logout.js”;Here, the .js extension is compulsory. Otherwise, the webpack throws an error.
Follow the steps below to modify an existing component:
-
Copy the file you want to modify.
-
Create an identical path in the
<IS_HOME>/repository/deployment/server/webapps/consentmgr/self-care-portal-frontend/toolkit/srcfolder. -
Modify according to your requirements.
-
Navigate to the
<IS_HOME>/repository/deployment/server/webapps/consentmgr/self-care-portal-frontenddirectory in a terminal. -
Run the following command.
npm run buildTip
If the changes are not visible in the Consent Manager application, restarting the Identity Server will reflect the changes.
Try Out Example 01
-
Copy the
<IS_HOME>/repository/deployment/server/webapps/consentmgr/self-care-portal-frontend/accelerator/src/common/Nav.jsxfile. -
Open the
<IS_HOME>/repository/deployment/server/webapps/consentmgr/self-care-portal-frontend/toolkit/srcdirectory. -
Create a folder named
commonthere if it does not already exist. -
Paste the
Nav.jsxfile in the<IS_HOME>/repository/deployment/server/webapps/consentmgr/self-care-portal-frontend/toolkit/src/commondirectory. -
Edit the
Nav.jsxin the above location. -
Navigate to the
<IS_HOME>/repository/deployment/server/webapps/consentmgr/self-care-portal-frontenddirectory in a terminal. -
Run the following command:
npm run build
Adding new components in the Consent Manager application
You can add your own files to customize the UI in the <IS_HOME>/repository/deployment/server/webapps/consentmgr/self-care-portal-frontend/toolkit/src folder.
For example, you can import the NewComponent.jsx file by adding the AppOverride prefix to the import and providing the full path relative to the toolkit folder.
import { NewComponent } from 'AppOverride/src/NewComponent.jsx';If you try to import the NewComponent.jsx file without adding the AppOverride prefix as follows, a bundler error will be thrown.
import { NewComponent } from '../NewComponent.jsx';Important
The file extension is mandatory for the imports added. For example,
import { NewComponent } from ‘AppOverride/src/common/NewComponent.jsx’;Here, the .jsx extension is compulsory. Otherwise, the webpack throws an error.
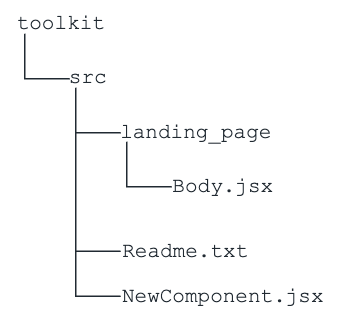
A sample structure of the <IS_HOME>/repository/deployment/server/webapps/consentmgr/self-care-portal-frontend/toolkit/src folder is shown below after adding the NewComponent.jsx file:
Follow the steps below to add a new component:
-
Create a new file in the desired location inside the
<IS_HOME>/repository/deployment/server/webapps/consentmgr/self-care-portal-frontend/toolkit/srcfolder. -
Add the import to the desired file. Follow the above-mentioned instructions when adding the
importstatements. Adding imports to an existing component modifies that file. Follow the Modifying existing components in the Consent Manager application section for more details. -
Navigate to the
<IS_HOME>/repository/deployment/server/webapps/consentmgr/self-care-portal-frontenddirectory in a terminal. -
Run the following command.
npm run buildTip
If the changes are not visible in the Consent Manager application, restarting the Identity Server will reflect the changes.
Try Out Example 02
-
Open the
<IS_HOME>/repository/deployment/server/webapps/consentmgr/self-care-portal-frontend/toolkit/srcdirectory. -
Create a new file named
NewComponent.jsxthere. -
Add the necessary code for the React component.
-
Open the
<IS_HOME>/repository/deployment/server/webapps/consentmgr/self-care-portal-frontend/accelerator/src/landing_pagedirectory. -
Copy the
Body.jsxfile. -
Create a similar path in the
<IS_HOME>/repository/deployment/server/webapps/consentmgr/self-care-portal-frontend/toolkit/srcdirectory. -
Paste the
Body.jsxfile there. -
Add the following import to the
<IS_HOME>/repository/deployment/server/webapps/consentmgr/self-care-portal-frontend/toolkit/src/landing_page/Body.jsxfile and use the component as needed.import { NewComponent } from 'AppOverride/src/NewComponent.jsx'; -
Navigate to the
<IS_HOME>/repository/deployment/server/webapps/consentmgr/self-care-portal-frontenddirectory in a terminal. -
Run the following command.
npm run build
Importing an existing Accelerator component to the newly added component
Consider the following example. NewPage.jsx is a newly added component to the toolkit. You want to import the Nav.jsx file of the Accelerator into it.
You can import an existing Accelerator component as follows:
import { Nav.jsx } from '../../accelerator/src/common/Nav.jsx';